
The purpose of this blog is to allow Citrix Administrators to implement and adopt Citrix App Layering technology to assist with management and delivery of images and applications to end users. This post will provide a step-by-step guide for configuring Citrix App Layering in MS Azure – I will take you through:
- ELM instance deployment process via PowerShell
- Configuration of the ALMC (App Layering Management Console).
- Configuration of a Network File Share
- Setup of Directory junction
- Configuration of App Registration / Service Principal within Azure
- Configuration of Azure App Layering Connector
- Future Blogs will focus on Deployment of:
- Configuration of New Azure Connector deployment from App Layering 2211 onwards
- OS Layer
- Platform Layer
- App Layer
- Elastic Layers
- User Layers
Introduction
If you are unfamiliar with the technology, Citrix App Layering is a flexible solution to provide a complex set of applications to a diverse set of users on any non-persistent supported platform.
App Layering is unique in how it performs image management. The Operating system and applications are split into containers which we call “Layers”. Layers can be created and updated independently before being compiled into a published image which can then be distributed using any supported provisioning method such as MCS(Machine Creation Services), PVS(Provisioning Services), etc.
The main objective of App Layering is to simplify Windows app management from a single user interface. This allows admins to create, manage and update enterprise applications regardless of the underlying hypervisor or cloud infrastructure which they reside. The OS and applications are separated into manageable layers, simplifying the environment and reducing management complexity, time and costs associated with OS and app management.
With each layer as a single instance, updates don’t have to be performed on every image in the environment. The OS Layer and App Layers are stored as virtual disks consisting of registry entries and files for each specific layer. There is 2 ways to deploy applications via App Layering with virtual machines:
Published image: This method combines the OS layer, a platform layer, and a set of application layers to create an image for provisioning systems like Citrix Provisioning or Citrix Machine Creation Services. App Layering can publish images to multiple provisioning systems and multiple hypervisors from the same set of layers.
Elastic Layers: Few application layers are attached to a virtual machine during the log-on based on AD group membership and application assignment. Allows greater flexibility in application assignment by allowing dynamic delivery of applications to standardized images.
Separating the applications and personalization from the operating system provides a flexible and manageable solution to non-persistent image management.
Advantages of Citrix App Layering for Image Management:
- Simplified master image management for PVS / MCS:
- App Layering single solution that supports provisioning models used with Citrix & 3rd party hypervisors.
- Support for Microsoft Azure
- Decouple apps and provisioning tools from the image:
- App Layering separates packaging from the image. Usually in image updates, each image has to be updated individually. With App Layering, 1 layer(1 application for example) can be part of many images.
- To update all of the images associated with that layer, it would required 1 single update to layer and the images will be regenerated.
- Upgrade to hypervisor tools, VDAs, PVS Tools become less complex.
- Supports Complex use cases
- Complex applications with kernel drivers, systems services, third-party drivers, and console access can all be supported using Citrix App Layering. Due to, App Layering’s two modes for app layer deployment almost all applications are compatible.
- Non-persistent desktop user layer:
- The user layer works as a writable elastic layer. When a user logs on, most write operations go to the user layer.
- This allows users to install apps, save configuration settings that are outside the user profile.
- User layer also stores users data files, really making their desktop experience seem to be peristent, even in the benefits of a shared desktop model.
Important Terms:
If you are planning to build an environment using Citrix Cloud, App Layering and Microsoft Azure, here is some important concepts to each one:
App Layering Concepts:
Enterprise Layer Manager (ELM)
- A virtual appliance that provides the functionality Citrix App Layering.
App Layering Management Console(ALMC):
- Web based console for Citrix App Layering. Accessed from the ELM appliance.
Azure Connector
- Interfaces with Azure and performs SDK calls to create packaging machines and publish images.
Golden Image:
- VM to create the OS layer which is the basis for all layers within Citrix App Layering.
OS Layer:
- Layer for Operating System. i.e. Windows 10 or Server 2016.
Platform Layer:
- Layer for the hypervisor and provisioning system in this case DaaS VDA, Hypervisor tools, etc
App Layers:
- Containers for applications.
Layered Image:
- OS, Platform and App layers combined to make a master image used by MCS to create a Machine Catalog.
Elastic Layer:
- Dynamically attached app layer. Mounted from the “Elastic Layer Share” by the Windows VM at logon.
User Layer:
- User Writable Elastic Layer – All user writes go into this layer. This is currently still in labs (beta).
Microsoft Azure Terms:
Resource Group:
- Container used in Azure to hold objects with defined permissions.
Availability Set:
- a collection of VMs managed to provide availability of at least one VM in the collection at all times. Virtual Machines in an Availability Set are spread across fault domains (racks and storage) and they are managed at separate times for automated updates.
App Registration / Service Principal:
- This is an Azure AD object which holds permissions for Azure Resources for applications. i.e. App Registration for Citrix Cloud Host Connection integration, or the App Layering Azure Connector configuration.
Storage Account:
- A container to provide namespace and access to storage files and blobs
Installation of App Layering in Azure:
System Requirements:
- Azure Account and Azure Subscription:
- To configure the App Layering ELM Appliance, you need credentials for a suitable account with correct permissions and access to the Azure Subscription.
- Virtual network in Azure:
- Your deployment can operate in a point-to-site or site-to-site virtual network.
- The appliance and network file share should have network connectivity. However the appliance doesn’t need network connectivity to the layered images which you have already published.
- A site to site connection between your corporate and Azure network is always recommended for accessing the management console for the Enterprise Layer Manager.
- A network file share
- Azure Resource Manager:
- App Layering works with Azure Resource Management model. Doesnt support Azure classic deployment model.
- All resources like virtual network, file shares and OS Machines that app layering will work with have to be created with ARM.
- Azure PowerShell v6:
- used to install the ELM Appliance in your Azure Resource Group.
Now that we have level set the terminology lets take a look at the configuration and deployment of App Layering in Azure, starting with the Enterprise Layer Manager (ELM) appliance via PowerShell.
ELM instance deployment process via PowerShell
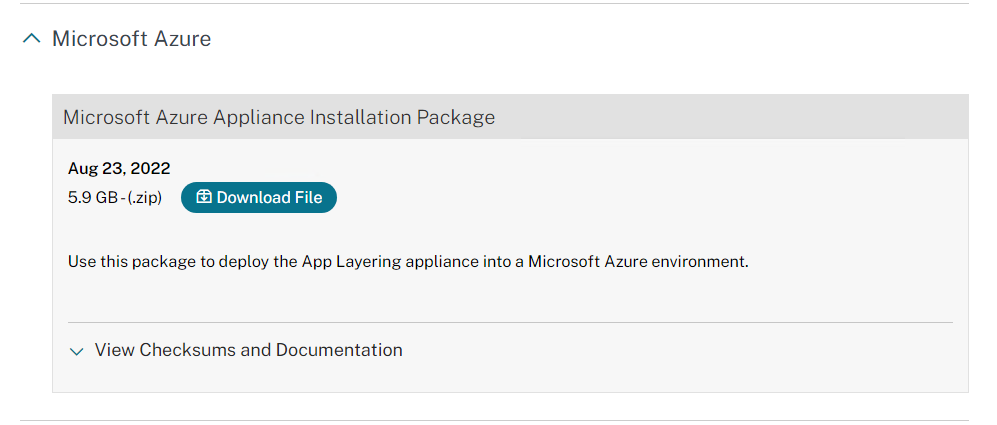
Download the latest App Layering Appliance for Azure from Citrix Downloads site. –
- Version 2208 Downloaded.
- Download the App Layering installation package to your Server you want to deploy the ELM appliance from via PowerShell. However you must ensure enough space, around ~40gb.
Steps for Installing the App Layering ELM Appliance in Azure:
The first task that we need to perform is to get the ELM Appliance provisioned in Azure, lets take a look at the steps detailed below:
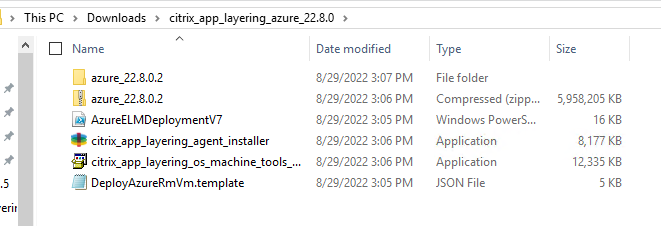
- On the server where you have downloaded the App Layering Installer, Navigate to the folder where you have downloaded the App Layering files.
- Ensure that there is greater than 40 GB available on the Machine.
- Unzip the ELM Appliance Download.
- Unzip the Appliance itself – Go for a coffee, it can take about 30 minutes to unzip 🙂
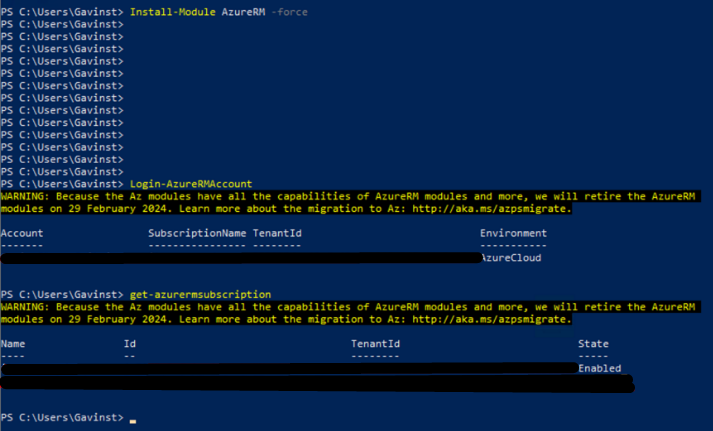
Run PowerShell as “Administrator”
- Install the AzureRm / Az PowerShell Modules
- Install-Module AzureRM -Force

- Login-AzureRMAccount

This will list your subscription ID and Tenant ID:
you can also run “get-azurermsubscription” to list all Subcriptions you are a member of:
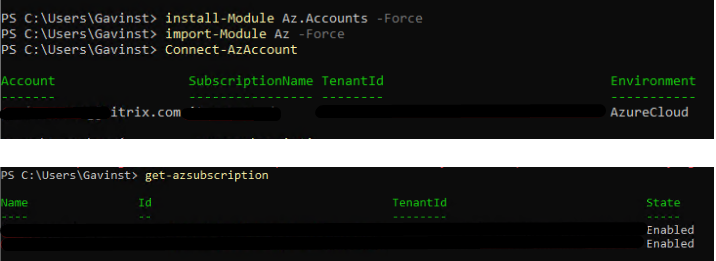
If we use the AZ Module and NOT AzureRM, we can run the following in PowerShell:
- Install-module Az.Accounts -Force
- Import-module Az -Force
- Connect-AzAccount
- Get-azsubscription
As part of the ELM download Citrix includes a PowerShell script to install the ELM appliance.
Run AzureELMDeploymentV7.ps1
Note: You may need to set the execution policy to unrestricted before running the script if not digitally signed:
- Set-ExecutionPolicy -Scope CurrentUser Unrestricted

Run AzureELMDeploymentV7.ps1:

- When running the Script, Enter “R” to run the script.
- Set the Deployment Name of your ELM Appliance.
- Select “Enter” to proceed with Default AzureCloud
- Enter Subscription name you wish to deploy the ELM Appliance.
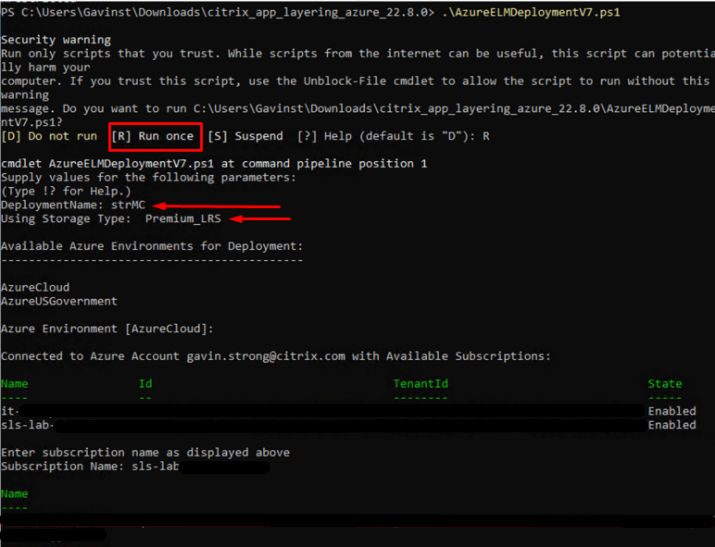
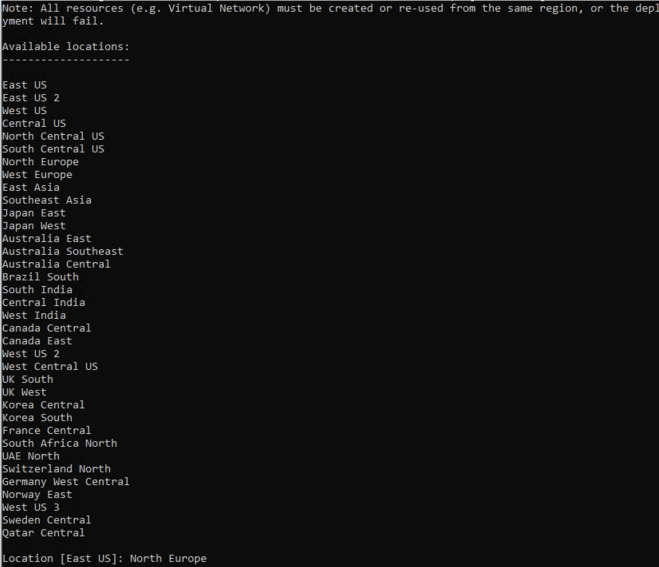
- Name the Resource Group to configure, along with the Storage Account:

- Select the Location for where resources will be hosted
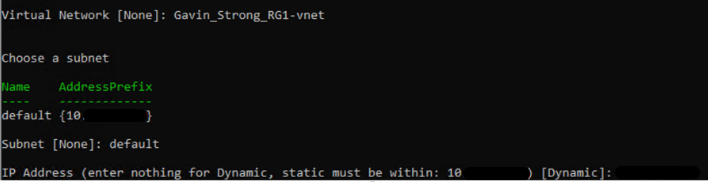
- Next, Choose a Virtual Network:

- Next select Subnet:
- Select VM Size:
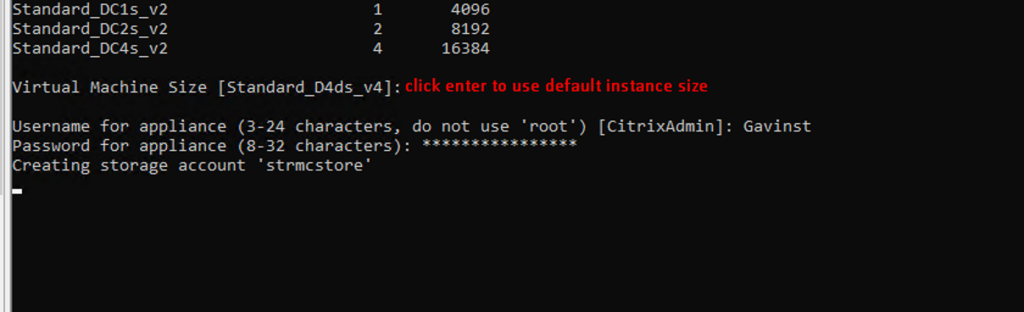
- This takes about ~45 min
- Hash OS Disk 13 min
- Detecting Empty Blocks 20 min
- Upload 5 min
- Create VM 5 min
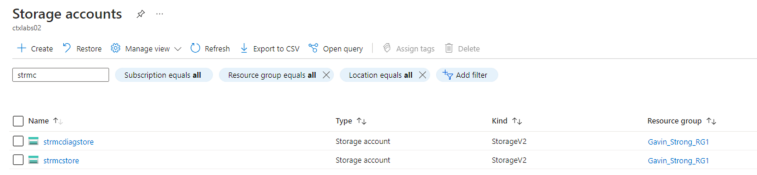
- Within Azure, we can now see that the Storage Account is Created, and the VM exists in Azure for the Enterprise Layer Manager.

Now, we can access the ALMC(App Layering Management Console)
Accessing the App Layering Management Console – Getting Started
Now that we have successfully provisioned the ELM Instance/Appliance in Azure, we can now access the App Layering Management Console (ALMC) via the Browser. The ALMC will be access by the IP Address of the ELM instance which we set during our previous task.
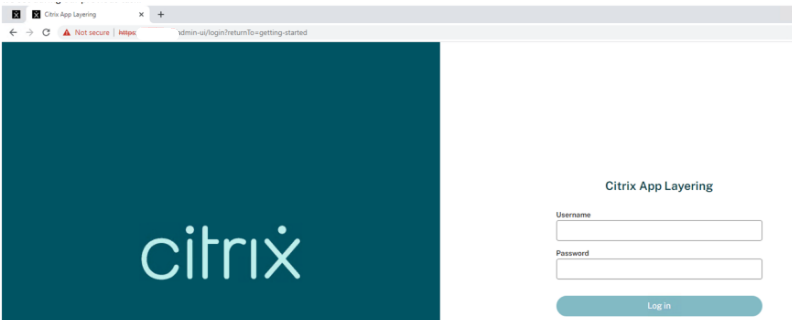
For the first logon to the App Layering, you must login with the root administrator account.
The Default credentials for the root administrator account are:
Username: Administrator
Password: Unidesk1
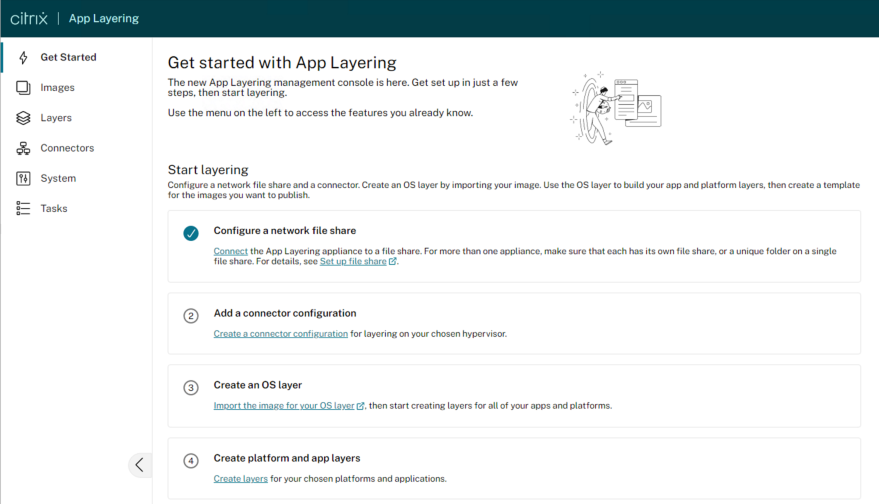
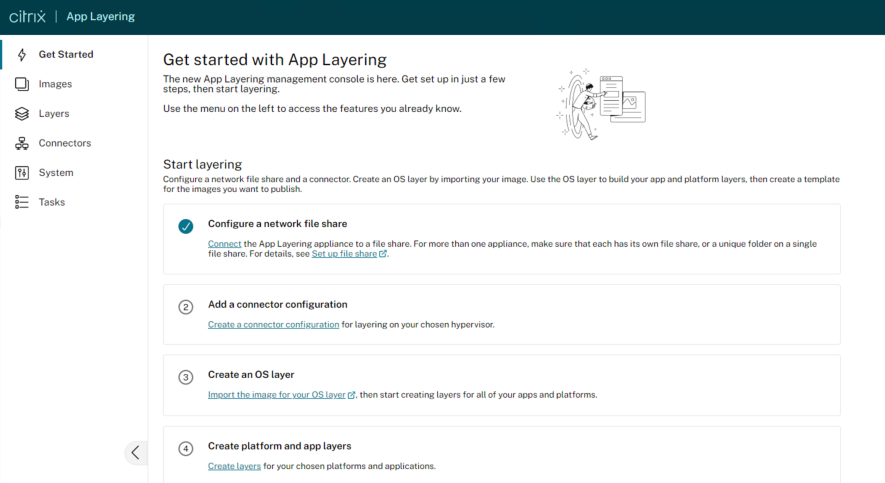
Upon Logon, the first page we land on is the “Getting Started” page, where we must configure a number of pre-requisites before we can begin provisioning layers:
- Configure a Network File Share
- Add a Connector Configuration
Creating Network File Share
- Pre-requisites: https://docs.citrix.com/en-us/citrix-app-layering/4/configure/set-up-file-share.html
Requirements
When setting up the appliance’s file share:
- The file share must be configured using Server Message Block (SMB) technology.
- The Service account that the App Layering appliance uses to connect to the file share must have full permissions for that file share.
- Users require read-only access to the file share. If you plan to enable user layers on the images you publish, also set the file share permissions detailed in Configure security on user layer folders.
- Ensure that you have the minimum storage space requirement of 40-100 GB for your file share. Note: Storage space is expandable. You can add space to a disk, or add other disks to the appliance.
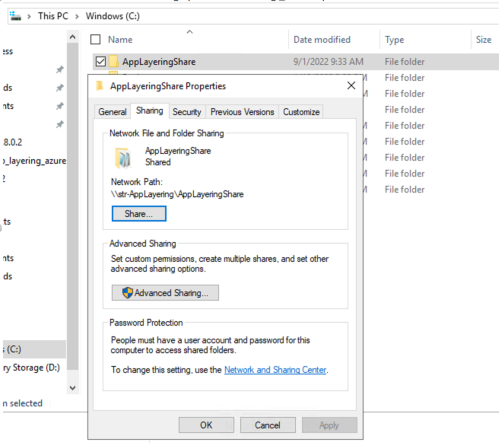
Create the Network File Share
Configure a file share that uses the SMB protocol.
- Follow the vendor’s instructions for setting up a file share using the SMB protocol.
- Ref: https://learn.microsoft.com/en-us/windows-hardware/drivers/debugger/file-share–smb–symbol-server
Configure the App Layering appliance to access the file share
Once you have created a file share, configure the App Layering appliance to attach to it. You can configure the appliance via the App Layering management console.
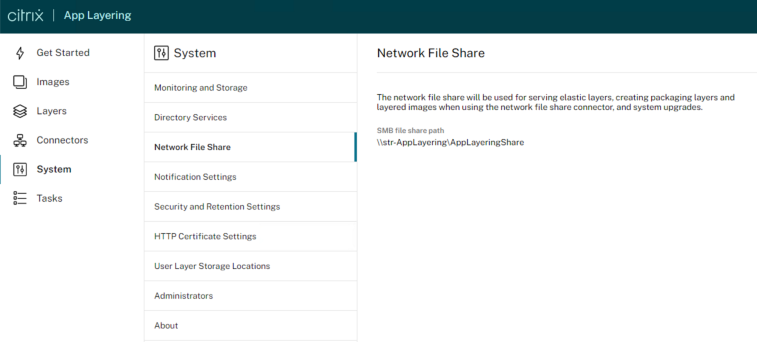
- In the Management Console, select System > Network File Shares and click Edit.
- Specify an SMB file share path, User name, and Password for the file share.
- Click Confirm and Complete to see if you can connect to the file share. The File Share is saved if the connection succeeds, or displays an error if the connection fails.
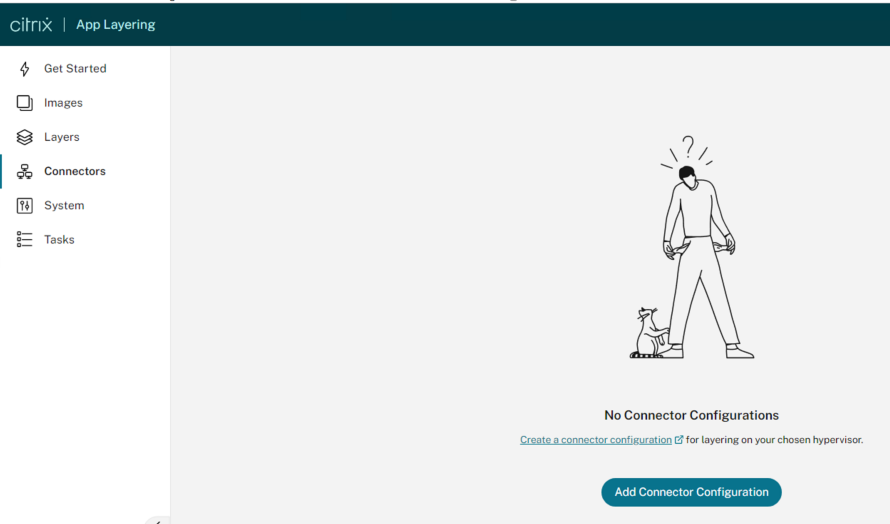
Add a Connector Configuration
Next from within the App layering Management Console, we must create / add a Connector configuration:
- Reference documentation: https://docs.citrix.com/en-us/citrix-app-layering/4/connect/ms-azure.html
The next major task is to create an Azure Connector. This requires the following preparation:
- Create a Storage Account for the Azure Connector to use
- Standard and Premium Storage (as of CAL 4.13)
- General Purpose V1
- Create an “App Registration” for the connector
- This is a Service principle for applications
- This allows permissions to be assigned to the connector
- Add a client key to the App Registration – An Authentication key (certificate-based password) for the application
- Assign Permissions to App Registration
- Resource Group <Azure AD> App Registration
- Find the Service Principal and make it a Contributor role in Azure
Using this connector, the appliance communicates with the following FQDNs:
- management.azure.com
- login.windows.net
- management.core.windows.net
- portal.azure.com/#create/Microsoft.Template/uri
- blob.core.windows.net
The appliance requires network connections with these servers.
Ref: https://docs.citrix.com/en-us/citrix-app-layering/4/connect/ms-azure.html
Select on “Create a Connector Configuration“:
Select “Azure” under “Choose Connector Type” > Select “New“:
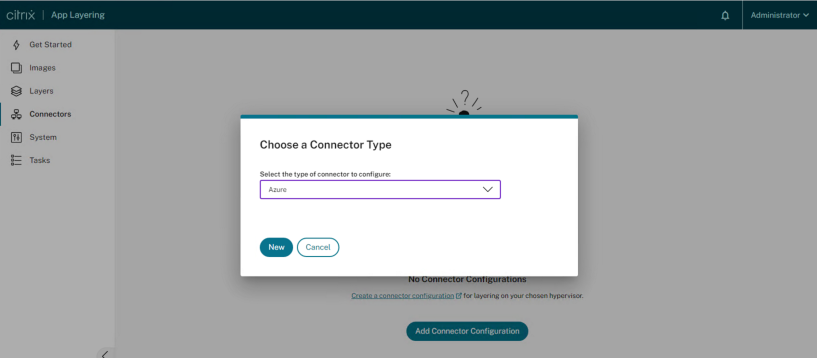
When you select “New“, it will redirect to the legacy connector configuration page.
Before we proceed further, the first action we need to take is create the “App Registration / Service Principal” in the Azure Subscription.
Creating App Registration in Azure
Within Azure, navigate to App Registrations > Register an Application:
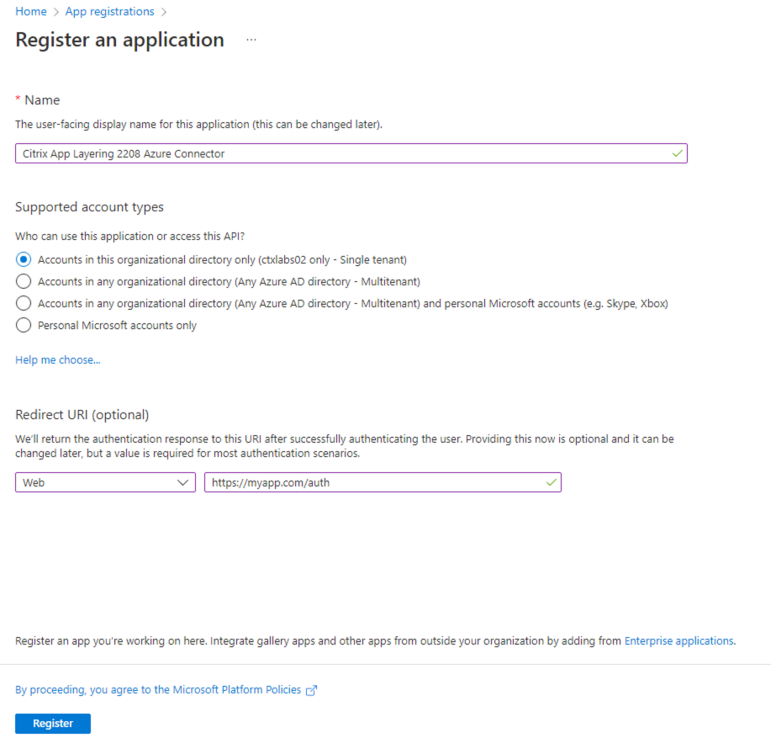
Once we have created our App Registration successfully, we will then generate a Secret Key – Once you generate your secret key, ensure to store it somewhere safe as it is only visible temporarily on creation!

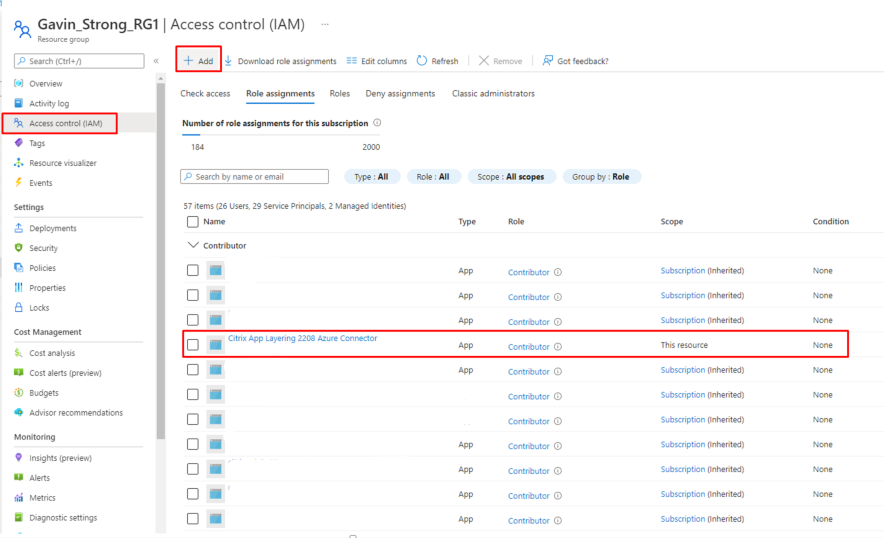
Assign App Registration with Contributor Role in Azure
Ensure the Correct permissions/roles set for your app registration in Azure:
- In this example I’ve given the App Registration/Service Principal Contributor role.
Now that we have correctly configured our App Registration, we are nearly ready to configure the App Layering Connector for Azure!
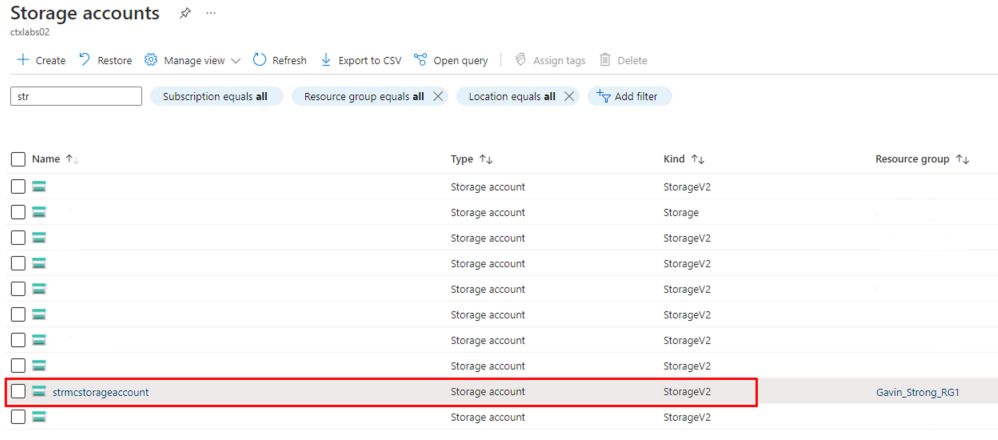
However, one final requirement before we proceed, is to create a Storage account in Azure.
Create a Storage Account in Azure
The Azure storage accounts are where the App Layering software stores all images imported from and published to Azure (virtual hard disks, or VHDs), along with the template file that you use to deploy Azure virtual machines, and the boot diagnostics files for those machines.
You can use an existing storage account, if it meets these requirements:
- It is not a classic storage account.
- It is in the same subscription used in the connector configuration.
In the App Layering Azure connector configuration, enter the storage account name in the Standard Storage Account field.
If you don’t have a storage account, create a standard storage account. Connector configurations require a standard account, though you can also specify a second storage account that is premium.
- On the Azure home page, click Storage accounts.
- In the Storage accounts window, click Add.
- In the Subscription field, select the subscription you are using.
- In the Resource group field, select Create New and enter a name similar to the name of the Storage account.
- In the Storage account name field, enter a memorable name.
- Select the Location.
- In the Performance field, if the location you chose is the only one for this connector configuration, select Standard. Otherwise, choose the best type for your needs.
- In the Account kind field, select general purpose v2 or general purpose v1.
- In the Replication field, select the type you need.
- For the Access tier (default), select Hot or Cold.
- Click Next: Networking, and select the connectivity method.
- Complete the remaining options under Networking, Advanced, and Tags.
- Select Review + Create.
- Finally, enter the new Storage account name in the connector configuration you are creating.
Ref: https://docs.citrix.com/en-us/citrix-app-layering/4/connect/ms-azure.html
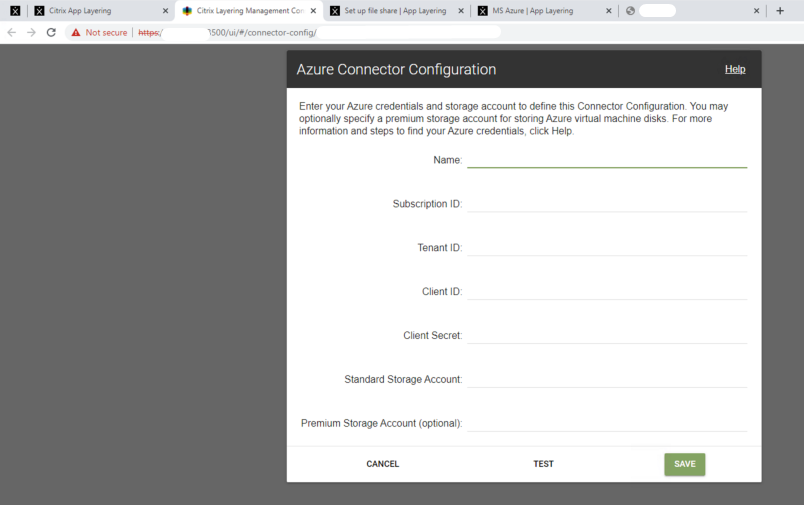
Azure Connector Configuration
Now that we have successfully configured our App Registration, generated our Client ID and Secret Key, and configured our Storage Account in Azure – We can now complete the configuration of our Azure Connector:

***************************
From Citrix App Layering 2211 onwards, Citrix has released a completely new Connector for Microsoft Azure which has been modernized for managing App Layering in Azure. The old connector which is detailed in this blog is deprecated, and due to be removed point in the future. This blog will be updated accordingly with reference to the new Azure Connector configuration as we implement and test.
New Azure Deployments connectors. Two new Azure connectors have been created and implemented into App Layering: Azure Deployments and Machine Creation for Azure Deployments. Both connectors also support Government environments (Azure Government and Machine Creation for Azure Government, respectively). The old Azure connector and Machine Creation for Azure connector (as well as their Government counterparts) are now deprecated, but still available for use for a limited time. For more information, see Azure deployments.
***************************
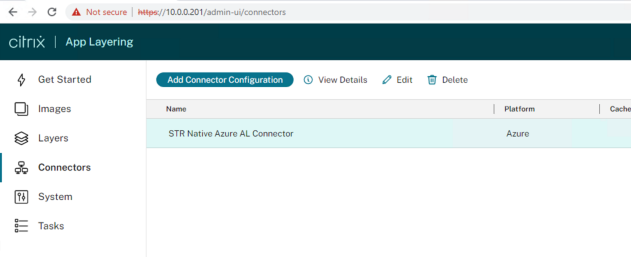
Now we have successfully configured out App Layering Azure Connector:
Next, and the final step we will cover in this blog is the creation of our Directory Junction within the App Layering Management Console.
Create a Directory Junction
- Click System > Directory Services.
- Click Add Directory Junction.
- Specify the details for the directory server:
- Server address – The name for the server that you use for the directory service (IP Address or DNS Name).
- Port – Specify the port number for communicating with the directory server.
- Use SSL – Click to enable Secure Sockets Layer (SSL) communication. If certificate errors occur, the wizard displays a list of these errors. If you are sure it is safe to ignore them, click Ignore Certificate Errors.
- Connect – Click to verify so the appliance can connect to the directory service.
- Bind Distinguished Name (DN) – To determine the correct syntax for the Bind DN or user name, see the documentation for your directory. The following examples show some of the ways you can specify a user for the directory service:
- domain\username
- username@domain.com.
- Bind Password – Type the password.
- Connect – Click to verify so the appliance can connect to the directory service.
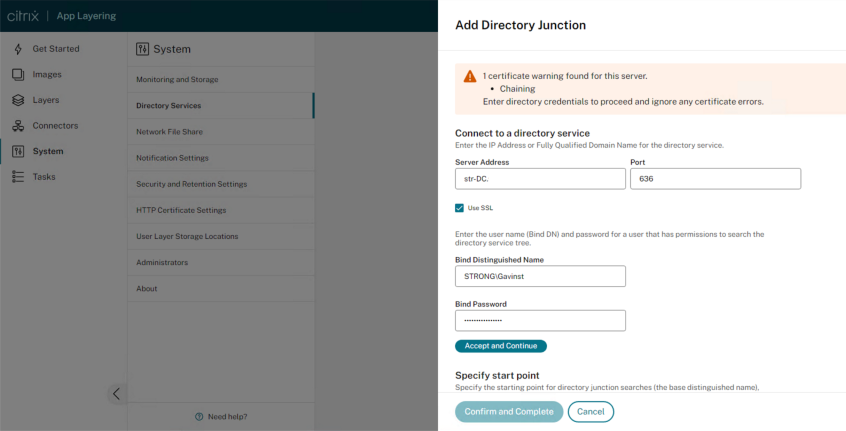
- Base Distinguished Name – Specify where the software starts searching for users and groups in the remote directory service.
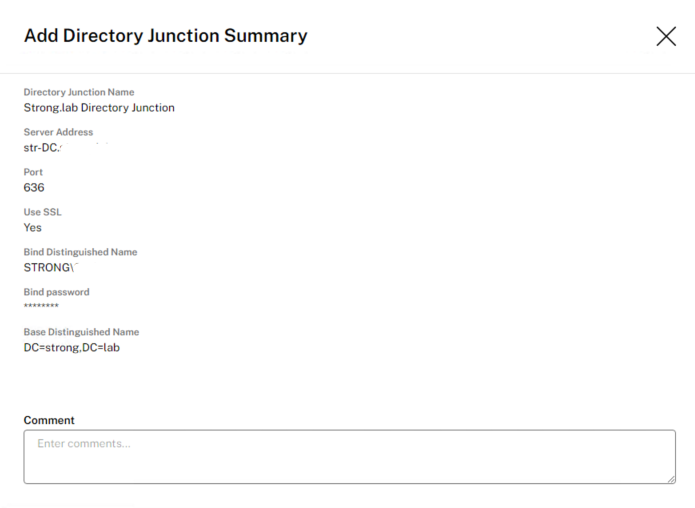
- Directory Junction Name – The name of the folder that you see in the tree view. You can use any name, including the name of a domain in your directory service tree.
- Click Confirm and Complete.

Once you have completed, click save:
***************************
From Citrix App Layering 2211 onwards, Citrix has released a completely new Connector for Microsoft Azure which has been modernized for managing App Layering in Azure. The old connector which is detailed in this blog is deprecated, and due to be removed point in the future. This blog will be updated accordingly with reference to the new Azure Connector configuration as we implement and test.
New Azure Deployments connectors. Two new Azure connectors have been created and implemented into App Layering: Azure Deployments and Machine Creation for Azure Deployments. Both connectors also support Government environments (Azure Government and Machine Creation for Azure Government, respectively). The old Azure connector and Machine Creation for Azure connector (as well as their Government counterparts) are now deprecated, but still available for use for a limited time. For more information, see Azure deployments.
***************************
To Summarise, in this blog post we have covered the following:
- ELM Appliance deployment process via PowerShell
- Configuration of the ALMC (App Layering Management Console).
- Configuration of a Network File Share
- Setup of Directory junction
- Configuration of App Registration / Service Principal within Azure
- Configuration of Azure App Layering Connector
- In the series of blogs that will follow, we will focus on Deployment of the:
- Configuration of New Azure Connector deployment from App Layering 2211 onwards
- OS Layer
- Platform Layer
- App Layer
- Elastic Layers
- User Layers

Hi gavinstrong96, Thanks for sharing this glad information with us https://jobizille.com/
LikeLike
It is a wonderful blog really I am very impressed. I never stop myself to say something about it. https://inloggento.com/
LikeLike